Intro to Git
Contents
- What is version control?
- Basics of Git
- Working with commands
What is version control?
Version control is a tool that allows you to...
Collaborate
Create anything with other people, from academic papers to entire websites and applications.
Track and revert changes
For example, when you edit a file, version control can help you determine exactly what changed, who changed it, and why.
If something goes wrong, you can revert the changes and go back to the last version (checkpoint) that worked.
Version control in use
Do you have files somewhere that look like this?
  Resume-September2016.docx
  Resume-for-Duke-job.docx
  ResumeOLD.docx
  ResumeNEW.docx
  ResumeREALLYREALLYNEW.docx
You invented your own version control.
Types of Version Control Systems (VCS)
But first some common vocabulary
- A repository is where you keep all the files you want to track.
- If you want to save a new version of your work and define a checkpoint, you commit your changes to the repo.
- In case others are working on the same repo, changes from their commits have to be merged with yours.
Centralized Version Control
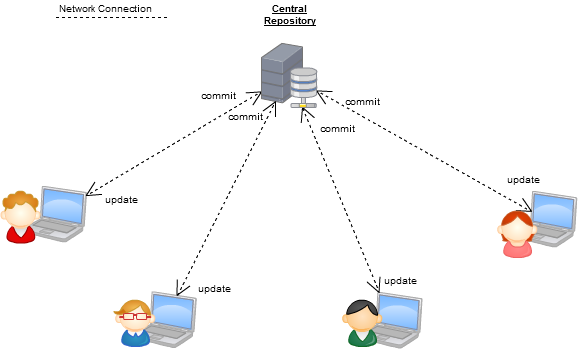
Centralized Version Control
There is one central server. Each client (person) checks out and merges changes to main server.
Examples:
- CVS
- Subversion (SVN)
- Perforce
Distributed Version Control
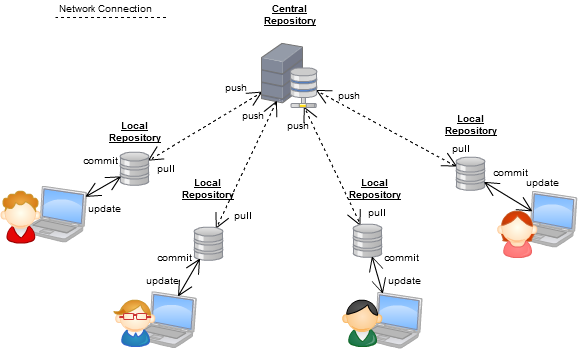
Distributed Version Control
Each client (person) has a local repository, which they can then reconcile with the main server via push and pull.
Examples:
- Git
- Mercurial
Why Use Git?
- Fast: Access information quickly and efficiently.
- Distributed: Everyone has his/her own local copy.
- Scalable: Enables potentially thousands (even millions) of developers to work on single project.
- Local: You don't need a network connection to use it. You only need a remote server if you want to share your code with others (e.g. using GitHub, GitLab or BitBucket).
- Branches: Keep your coding experiments separate from code that is already working.
- Everyone has a local copy of the shared files and the history.
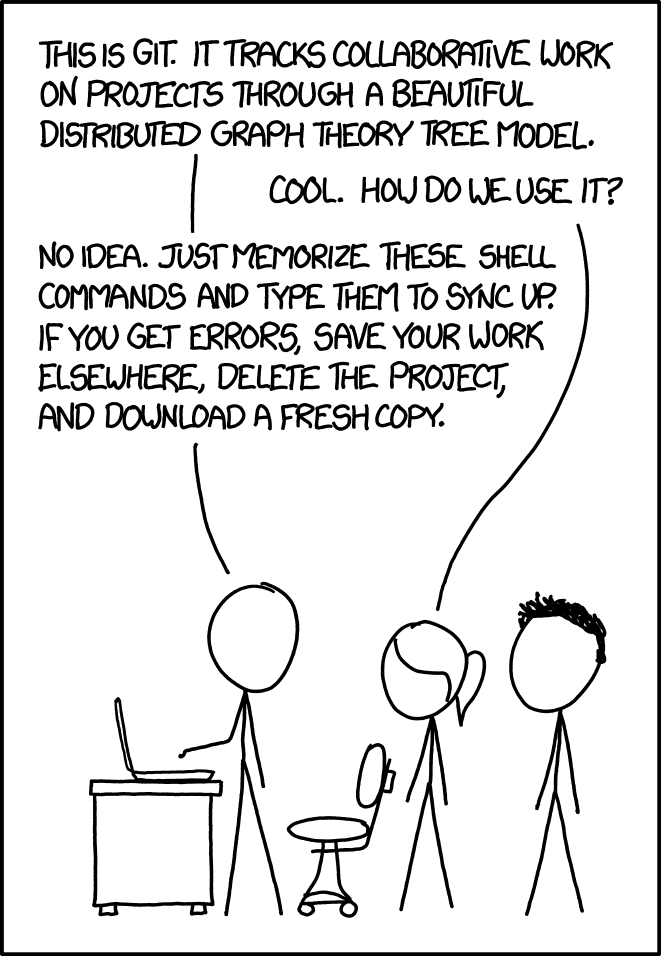
Git at Powercoders
- We will use Git as a version control system (VCS) for all of our exercises.
- Use Git daily to get used to the vocabulary and it becomes second nature to commit.
- VCS are commonly used in web and software development teams.
- Git is with 89% the most used VCS.
Installation
- Download Git
- Install Git
double-click on downloaded program and follow the instructions - Choose Visual Studio Code as Git's default editor
- Open Visual Studio Code > Terminal (wsl / zsh) after installation
Setup
Set up name and email in git config. Let's do it together.
$ git config --global user.name "Your Name Here"
# Sets the default name for Git to use when you commit
$ git config --global user.email "your_email@powercoders.org"
# Sets the default email for Git to use when you commit$ git config --global init.defaultbranch "main"
# Sets the default branch to the name "main" instead of "master"$ git config --global core.editor "code --wait"
# Sets the default editor to VSC$ git config --listGit Basics
Making a Repo
What is a repository (repo)?
- Remember: A repository is where you keep all the files you want to track.
- Essentially, a Git version of a project folder.
- Git will track any changes inside of a repository. Unless you
specifically tell it not to via
.gitignore.
Create a Local Repository
- First, we need to define where the respository should be.
- Let's create a folder called poco to the desktop.
$ cd Desktop

# create the folder
$ mkdir poco

# next go inside
$ cd pocoCreate a Local Repository
- Check if we are where we want to be
$ pwd - Initialize the folder as a local Git repository
$ git status
# should show an error because
# we haven't made it a repository yet.

$ git init
$ git status
What did we just do?
git initwill transform any folder into a Git repostiory.- You can think of it as giving Git super powers to a folder so that Git starts tracking any changes in that folder.
- If the command
git statusreturns no errors, it means your folder has successfully been Git-ified!
Good repository practices
- Repos are meant to be self-contained project
folders.
'Project' can be how you define it - one html page or a whole app. - Name folders with all lowercase letters and with no spaces - use dashes or underscores instead.
- It's possible to have multiple repositories on the computer.
- But don't put a repository inside another!
Tracking Changes
Tracking States in Git
As you make changes in your repo, you can tell Git how to treat those changes.
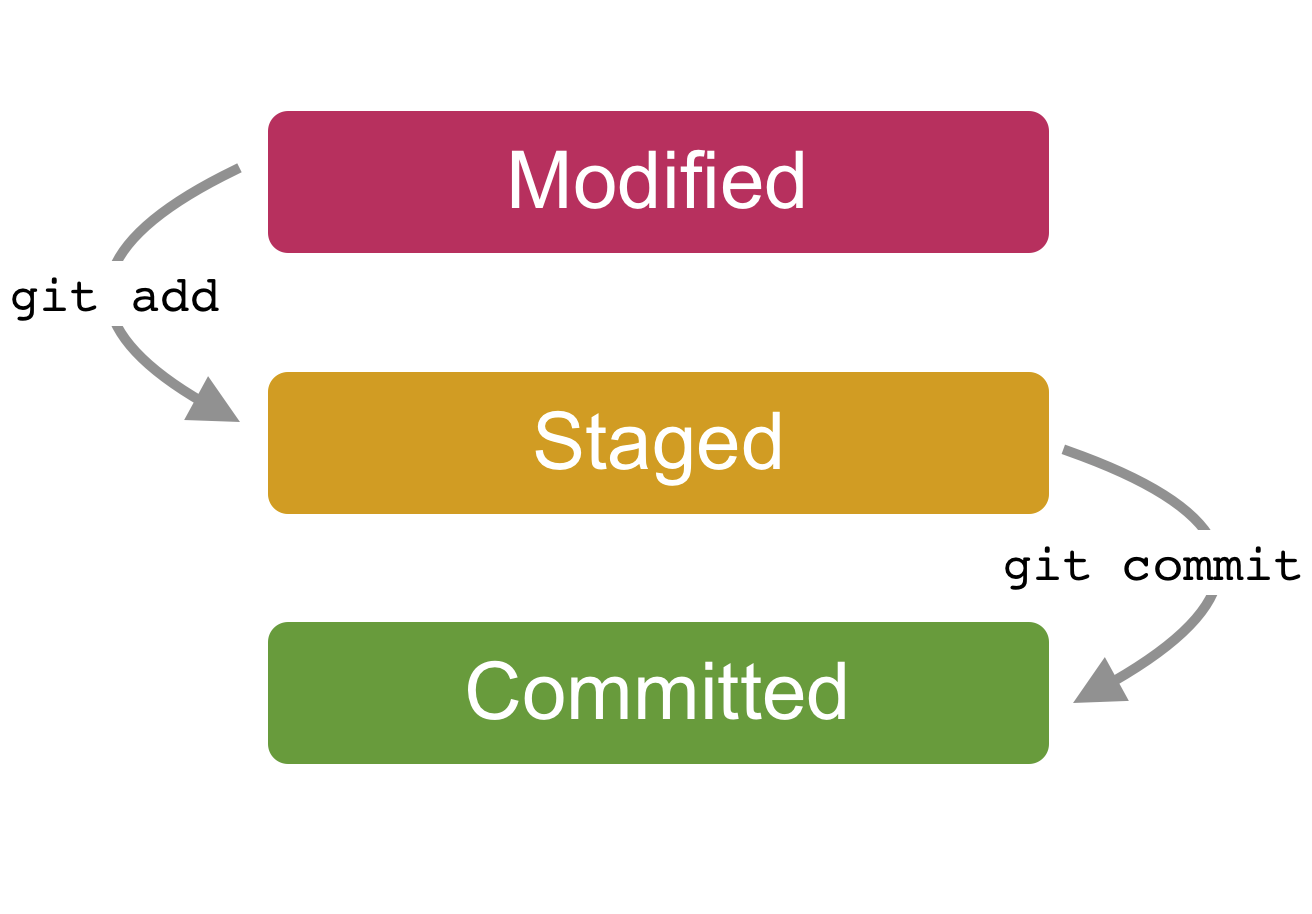
The Magical Realms of Git
Each of the states of Git corresponds to an area of the Git repo, so here's some vocab:
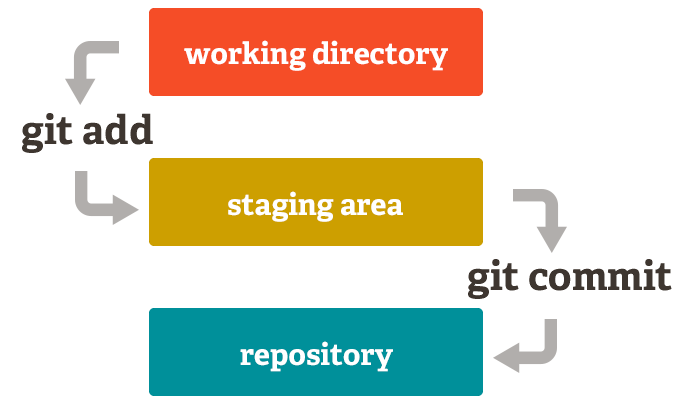
The Magical Realms of Git
- Working directory/tree: The current version of your project where you are making changes (which is reflected in your code editor)
- Staging Area: The place where you stage your files when you are readying them to commit
- Repository: When you commit, Git permanently saves only the changes from your staging area to the repo's memory
Create a file
- Create a new file in your new folder named
index.html - Check the status of your repo with
git status
Create a file
$ touch index.html$ git statusModified/Untracked
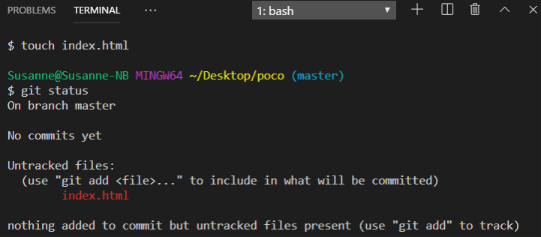
Status you get when you make changes to a file or add a new file but haven't added or committed yet
Unified diff format
 1: @@ -10,6 +10,5 @@
 2:  <p>This was one of my
 3:   multiline sample paragraphs</p>
 4:
 5: -<p>This text will be deleted.</p>
 6: -
 7: -<p>This text will be updated.</p>
 8: +<p>This text will be updated
 9: +  with some extra content.</p>
10:
11: +<p>This one is completely new.</p>
12: +
13:  <p>One more line of text.</p>
14:
@@ is the chunk
header
-m,n= Starts at linem, continues fornlines+o,p= Starts at lineo, continues forplines
SpaceThis line is not changed-= This line was deleted+= This line was added
Add a file to staging
- Tell Git to track our new file with
git addplus filename. - Check the status of your repo with
git status.
Add a file to staging
$ git add index.html$ git statusStaged
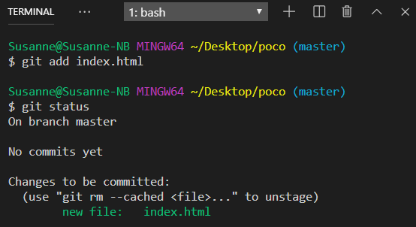
Status you get when use
git add to let Git know that
these are the files you want to 'stage' or prepare for committing.
Committing changes
- Check the status of your repo with
git status. Make sure that the changes listed represent exactly what you want to commit. - Commit the change with a message that explains and describes what changes you made.
Committing changes
$ git status$ git commit -m "Add index.html to repository."Committed!

Success!
Congratulations.
You are now using Git.
What did we just do?
How is this different from just saving a file?
- When we
git adda new file, we tell Git to add the file to the repository to be tracked. - This is also called staging a file. We can see our changes in the staging area (aka the index, aka the cache), ready to be saved.
- A
git commitsaves the changes made to a file, not the file as a whole. The commit will have a unique ID so we can track which changes were committed when and by whom.
In other words...
...a commit is like a snapshot of your project at a current time
Look at your progress
$ git logcommit 91ee3768d599ab7223cbd4247c8752fc1636edad (HEAD -> main)
Author: susanne susanne.koenig@powercoders.org
Date: Fri Aug 30 16:36:09 2019 +0200
First commit. Added index.html to repository.
On Mac, type q to exit the log.
What is a HEAD?
HEAD refers to the most recent commit on the current branch.
A branch is the name for a separate line of development, with its own history.
By creating a repo, a branch called main is automatically created.
When to commit?
- Commit early and often
- When you have completed a mini 'idea' or 'task':
- You got a function to work
- You corrected a few misspellings
- You added some images
- Only commit when your code works!
Try not to commit broken code.
Good commit messages
Include a short but precise message of the changes you have made, in the present tense.
$ git commit -m "Add capitalization function for header text"Other people need to be able to read your commit history and understand what you were accomplishing at each step of the way.
Article to read: Art of the commitQuick recap
git init: turns a folder into a Git repositorygit status: checks the status of your filesgit add [file_name]: adds file to the staging areagit commit -m "your commit message": commits your changesgit log: see your commits so far
One more thing: git diff
When files have been modified in the working directory, it might be helpful to easily view what changed to double check that they're what we want.
$ git diffThis shows the difference in the content of the files in the working directory and the ones in the staging area (also called index).
Reverting Changes
We all make mistakes

Don't worry. Git is your friend.
Try It Yourself
- Move back to your poco repository (from the exersices)
- Try each of the following scenarios yourself:
Scenario 1: Undoing modified/untracked changes
You made some changes to some files and realize you don't want those changes. The files have not git added or committed yet.
Open index.html in Visual Studio Code and add a new line of text. Then:
$ git restore index.htmlLook at index.html in your editor: your changes are not there anymore. You've gone back to the previous commit state.
Scenario 2: Unstaging a file
You git add a modified or new
file, but realized you don't want it your next commit.
In Visual Studio Code create a new file and name it test.txt. Then:
$ git add test.txt
$ git status
$ git reset test.txt
$ git status
The file is removed from staging, but your working copy will be unchanged.
Alternative: Unstaging a file
You git add a modified or new
file, but realized you don't want it your next commit.
In Visual Studio Code create a new file and name it test2.txt. Then:
$ git add test2.txt
$ git status
$ git restore --staged test2.txt
$ git status
The file is removed from staging, but your working copy will be unchanged.
Scenario 3a: Uncommitting, but want to keep all your changes
You made a commit, but then realize that a piece of code doesn't work, so you just want to uncommit.
Open index.html and make some changes. Then:
$ git add index.html
$ git status
$ git commit -m "Make changes to index file"
$ git reset --soft HEAD~1
$ git status
Explanation
Your most recent commit is called the HEAD.
Passing git reset the options of
--soft HEAD~1 essentially asks to
move the HEAD back by one commit (essentially uncommitting your most
recent commit).
--soft means you won't lose your
changes—they'll just move to staging.
Scenario 3b: Uncommitting, but you don't want to keep any changes
You realize you don't want any of the code in your previous commit, so just getting rid of that commit completely.
You still have the change in the staging area for index.html
$ git add index.html
$ git status
$ git commit -m "Make changes to index file"
$ git reset --hard HEAD~1
$ git status
Explanation
Passing git reset the options of
--hard HEAD~1 will delete the
last specified commit and all the work related to
it.
Heads up—there are many, many different ways to undo changes. That's what's powerful about Git. Learn more at Atlassian tutorial
Branching
Branching
A branch is essentially another copy of your repo that will allow you to isolate changes and leave the original copy untouched. You can later choose to combine these changes in whole or part with the "main" copy, or not.
Branches are good for features!
Pssst...what's a feature?
Can be something as big as adding a new section to a site or an app, to a small functionality (a carousel on the homepage)
Branching
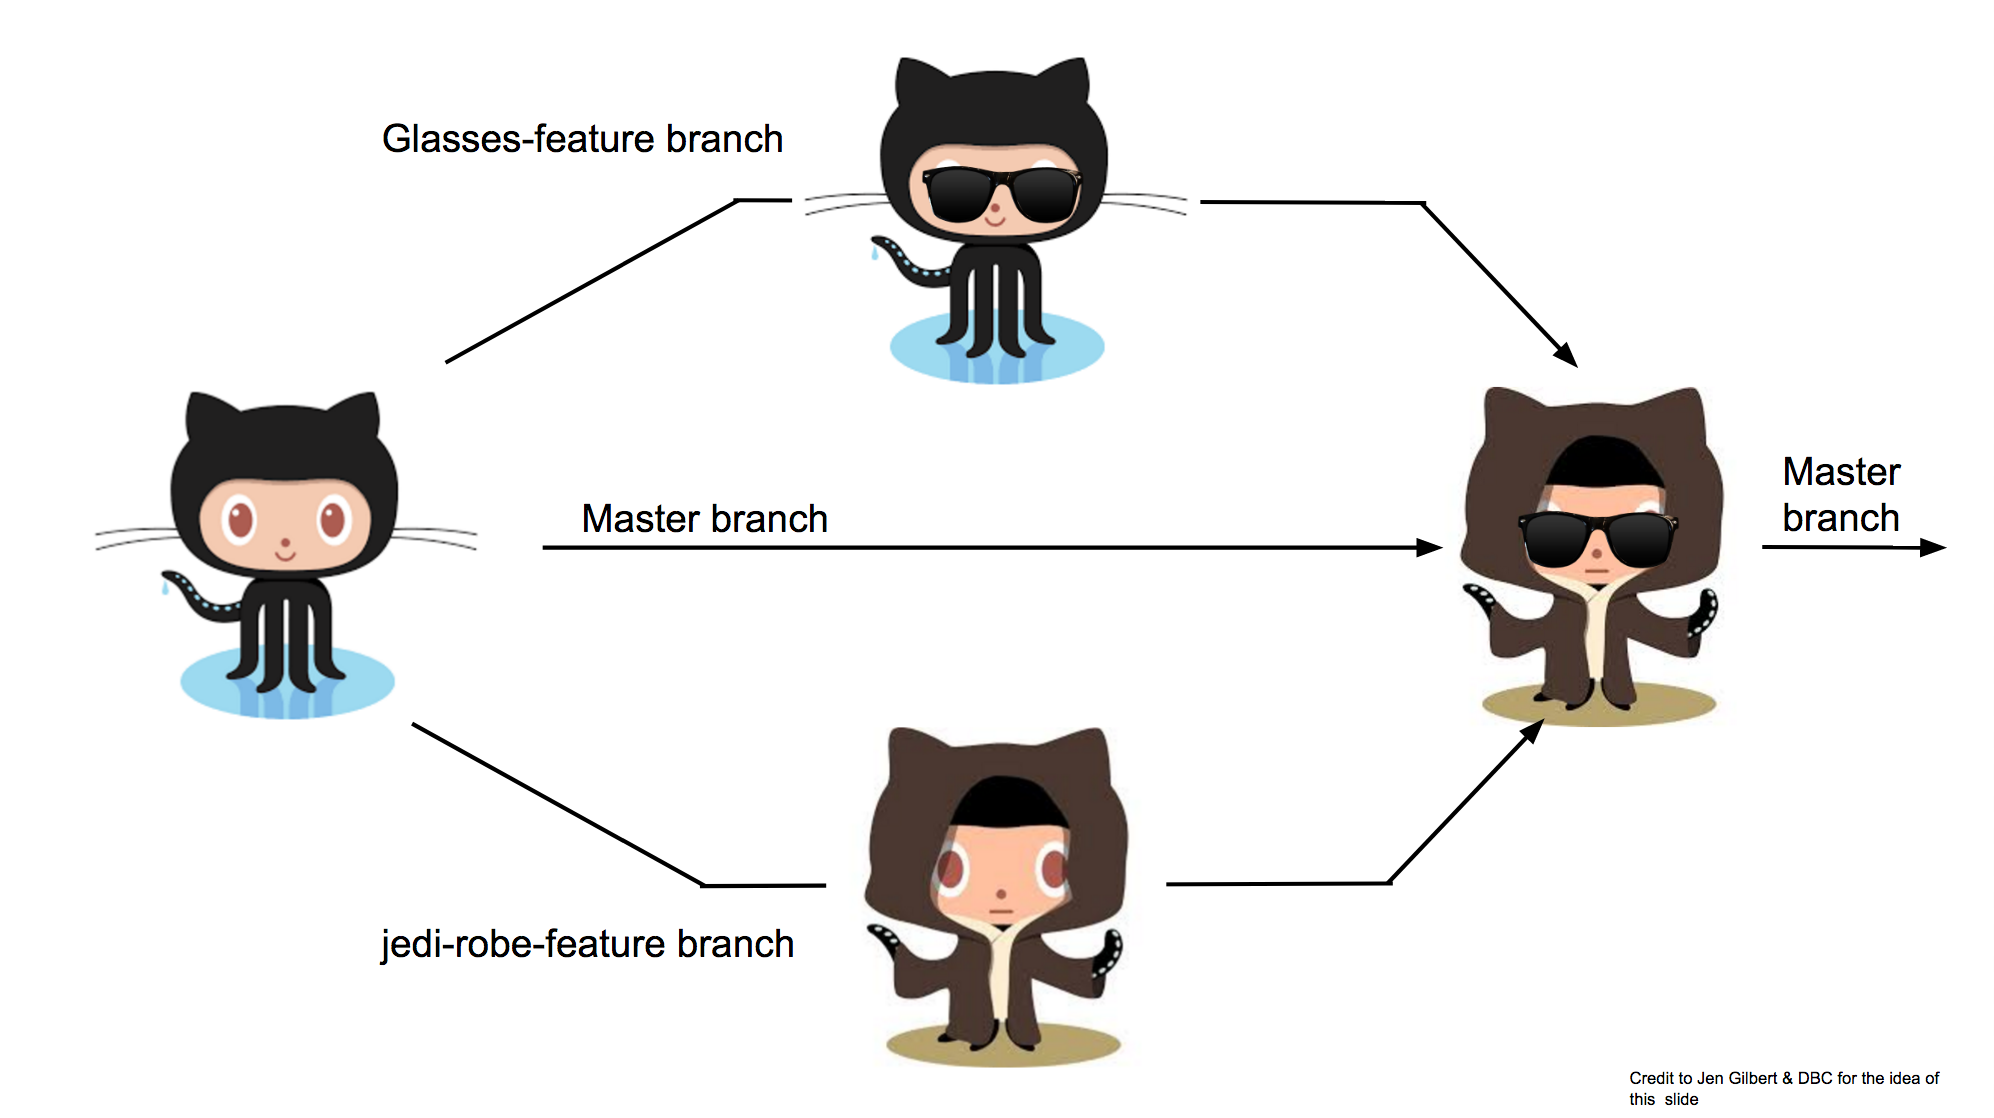
Why Do We Need Branching?
- Develop different code on the same base
- Conduct experimental work without affecting the work on main branch
- Incorporate changes to your main branch only if and when you are ready...or discard them easily
Branches are cheap!
Branching cycle
So, you want to develop a new feature:
- Make sure you are on main
- Create a new branch and jump over to it
- Develop your code. Commit commit commit!
- When the feature is done, merge it into main
- Delete your feature branch!
Try It Yourself
Create a new branch called feature.
  $ git branch
  // you should see only * main
  $ git switch -c feature
  $ git branch
  // you now see * feature and below main
Okay, let's break that down
git branch: tells you what branches (with commits) you have, and*indicates which branch you are currently ongit switch -c branch-name: the-ccreates a new branch, andswitchwill hop you over to that branch- An older way to do that is by
git checkout -b branch-name: the-bcreates a new branch, andcheckoutwill hop you over to that branch
Next: Committing on a new branch
Add new lines to index.html
  $ git add index.html
  $ git commit -m "Adding changes to feature"
  $ git log --oneline
Branching
What we just did, in picture form:
Next: Switching branches
$ git branch
Switch to main branch and look at the commit history
  $ git switch main
  $ git log --oneline
Switch to feature branch and look at the commit history
  $ git switch feature
  $ git log --oneline
Next step: Merging
Merge to get changes from one branch into another
Switch to main and merge changes
  $ git switch main
  $ git merge feature
  $ git log --oneline
Merging Branches
When you merge, you create a new commit on the branch you just merged into

Delete feature branch
Since your code from your feature branch is merged into
main, you don't need the branch anymore!
$ git branch -d featureHint: Make sure not to be on the branch you are deleting.
Quick review
git switch -c [branch_name]: creates a new branch and hops over to itgit switch [branch_name]: switch to another branchgit branch: lists all your branchesgit merge [branch_name]: merges branch into the current branchgit branch -d [branch_name]: deletes branch
What could possibly go wrong?
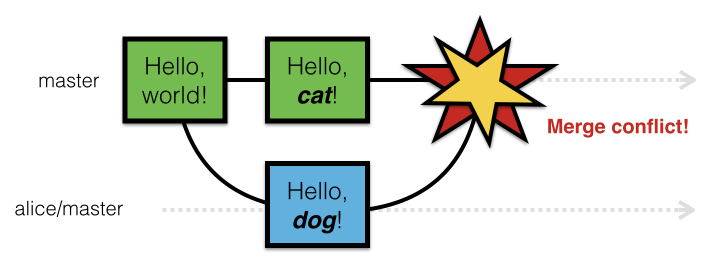
There could be a merge conflict.
Create a Merge Conflict
Go back to your poco project on your desktop.
Change the first line in index.html in the
main branch
  $ git add index.html
  $ git commit -m "Changing index page in main"
Now change the first line in index.html in feature branch
  $ git switch feature
    # open index.html and change the first line
  $ git add index.html
  $ git commit -m "Changing index page in feature"
Merge conflicts
Merge the changes from main into the feature branch
  $ git merge main
  #remember, you are on the feature branch here
You will be notified of a conflict. Go to the file in your editor and fix the problem. Then add and commit your edits.
Merging

The merge conflict occurred because the feature branch (which is based off of main) and the main branch both had divergent histories for the same file.
Vocabulary Review
- A repository is where you keep all the files you want to track.
- A branch is the name for a separate line of development, with its own history.
- A commit is an object that holds information about a particular change.
- HEAD refers to the most recent commit on the current branch.
Command Review
initstatusaddcommitlogrestoreswitchbranchmerge
... and many more