Setup
Contents
What do we need to start?
- Browser
- Editor
- Windows only: pimp your terminal
Browser
- Chrome: Installation link
- Firefox: Installation link
Editor
Could be any text editor, but developers prefer one with syntax highlighting.
We will use Visual Studio Code.
Recommended extensions
- Live Server
- Prettier
- vscode-faker
Try out different themes or other extensions.
Pimp your terminal
Windows user only
Online tutorial
The next slides guide you to the setup step by step. This video is doing that as well and might be an additional help during setup.
Windows 10 or 11
For this setup, you need to be on Windows 10 or Windows 11, with all the latest updates installed.
To check your Windows version:
- Press
Windows+R - Press
winver(ortaskmgr) - Press
Enter
If the first words of this window are Windows 11 you're good to go! If they are Windows 10, follow to the next slide. If it something different, please upgrade to Windows 10.
Minimum version
For some of the tools we use we need the 2024 version
on Windows 10 or above. Let's check which version you have:
- Press
Windows+R - Type
winver - Press
Enter
If it says at least 2024, you are good to go! If not, you need to update.
Latest updates
Open Windows update:
- Press
Windows+R - Type
ms-settings:windowsupdate - Press
Enter - Click on
Check updates
If you have updates available please install them and repeat the process until it says that you are up to date.
Virtualization
Let's check if the virtualization options are enabled in the BIOS of your computer:
- Press
Windows+R - Type
taskmgr - Press
Enter - Click on the
Performancetab - Click on
CPU
If it says virtualization: enabled in the right
column, you are good to go! If it is disabled or missing, please
follow the next slide.
Enable Virtualization
These steps depend on the motherboard in your PC. If you have any difficulties try to look up the steps for your specific PC model on Google.
- Restart your computer
- Press the BIOS hotkey during startup
Usually: Esc, F2, Del, etc. - Change BIOS mode to
Advanced - Search for
CPU Virtualization - Enable it and
save & exitthe BIOS
Windows subsystem for Linux
WSL is the development environment we are using to run Ubuntu. You can learn more about WSL here.
- Press
Windows+R - Type
powershell - Press
Ctrl + Shift + Enter
You use the Ctrl + Shift + Enter key stroke to execute
Windows PowerShell with administrator privileges.
You may have to accept the UAC confirmation about the privilege elevation.
Install WSL
A blue terminal window will appear:
- Copy the following commands
- Paste them into the PowerShell window by right-clicking into it (Ctrl + V does not work here!)
- Run them by pressing
Enter
wsl --installwsl --set-default-version 2wsl --updateIf you have an older Windows version follow these instructions.
Install Ubuntu (Terminal)
- Click on
Start - Type
CMD - Open the command prompt
- Type in the command
wsl --install -d Ubuntuand hitenter
If this does not work, you can also install Ubuntu as described in the next step.
Install Ubuntu (Windows Store)
Only follow these instructions if the precious step did not work!
- Click on
Start - Type
Microsoft Store - Click on the Microsoft Windows Store in the list
- Search for
Ubuntuin the search bar - Select version without any number, just plain "Ubuntu"
- Click on
Install
Don't install Ubuntu 18.04 LTS nor Ubuntu 20.04!
Launch Ubuntu
Once the installation is done, the Install button becomes a
Launch button. Click on it.
At first launch, you will be asked some information: username and password.
When typing the password, nothing will not appear on the screen — there will be no familiar typing indicator even though your keystrokes are being registered.
Connecting VS Code to Ubuntu
To make VS Code interact properly with Ubuntu, let's install the Remote - WSL VS Code extension.
- Open your Ubuntu terminal.
- Copy-paste the following commands in the terminal:
code --install-extension ms-vscode-remote.remote-wsl - Then open VS Code from your terminal:
code .
Install ZSH
During the bootcamp we will use the shell named
zsh:
Open the Ubuntu terminal in VS Code
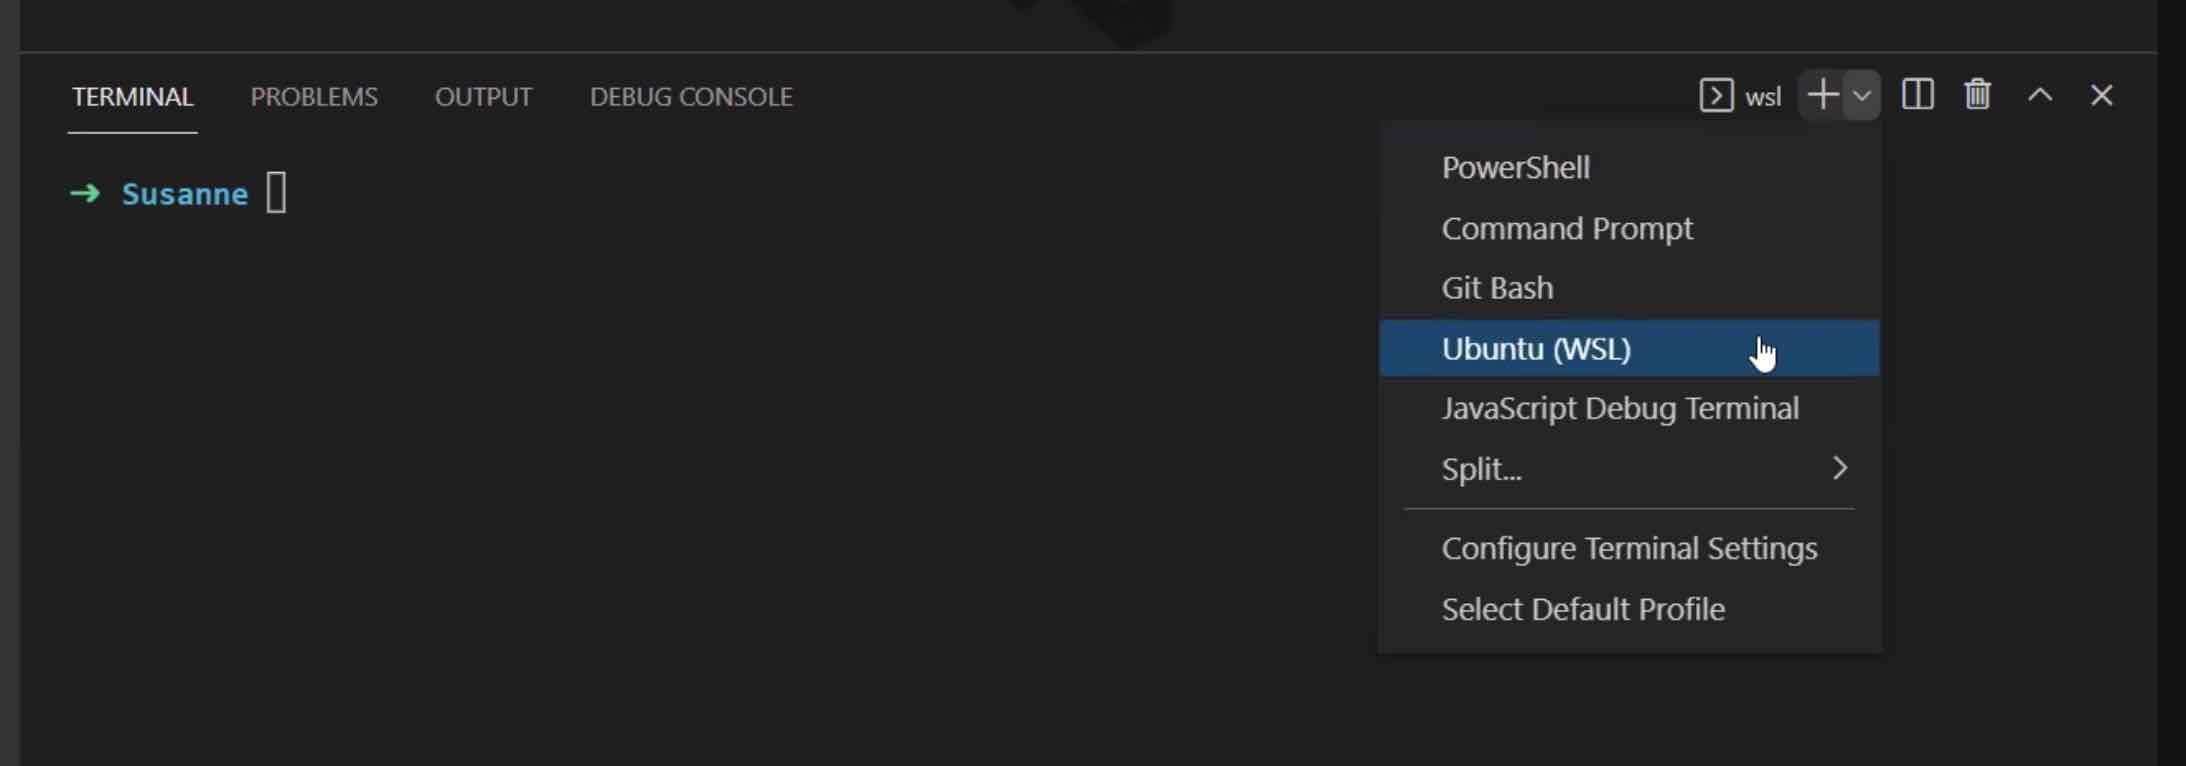
sudo apt update
sudo apt install -y curl git imagemagick jq unzip vim zsh
                tree
Install Oh-my-zsh
For all users: Windows, Mac and Linux.
During the bootcamp we will use the shell named zsh and
the ush plugin Oh-my-zsh:
- Copy & paste the commands below to a terminal
sh -c "$(curl -fsSL https://raw.github.com/ohmyzsh/ohmyzsh/master/tools/install.sh)" - If asked "Do you want to change your default shell to zsh?", press Y
Other tools we use
- Google classroom
- GSuite: email, calendar, drive
- Slack
- Zoom
Nothing new, but make sure it is available on the laptop you use during the bootcamp.
Powercoders course channels
🔒ch-25-2-bootcamp- The channel for everyone involved in this class- Announcements from teachers, coaches, mentors
- Questions from you
- Success stories, achievements, news
#zrh, #ch-resources- Interesting articles, job offers, courses
#ch-random- Everything else
-
#100hrs
Rules for Slack
- Use the appropriate channel
Not sure?#ch-random - Use
@[username]in a message / in a channel to notify them - Using
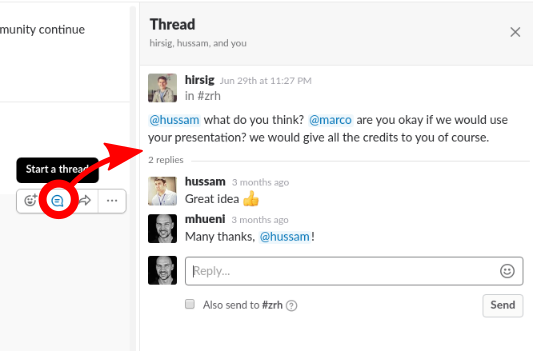
@channelin a message notifies everyone in the channel - Use threads
- Use the appropriate channel
Guidelines for video calls
- Have your camera on, so everybody can see each other
- Use your headphones and try to find a quiet spot if possible
- Be ready 10 minutes before the start and check if microphone and camera are working
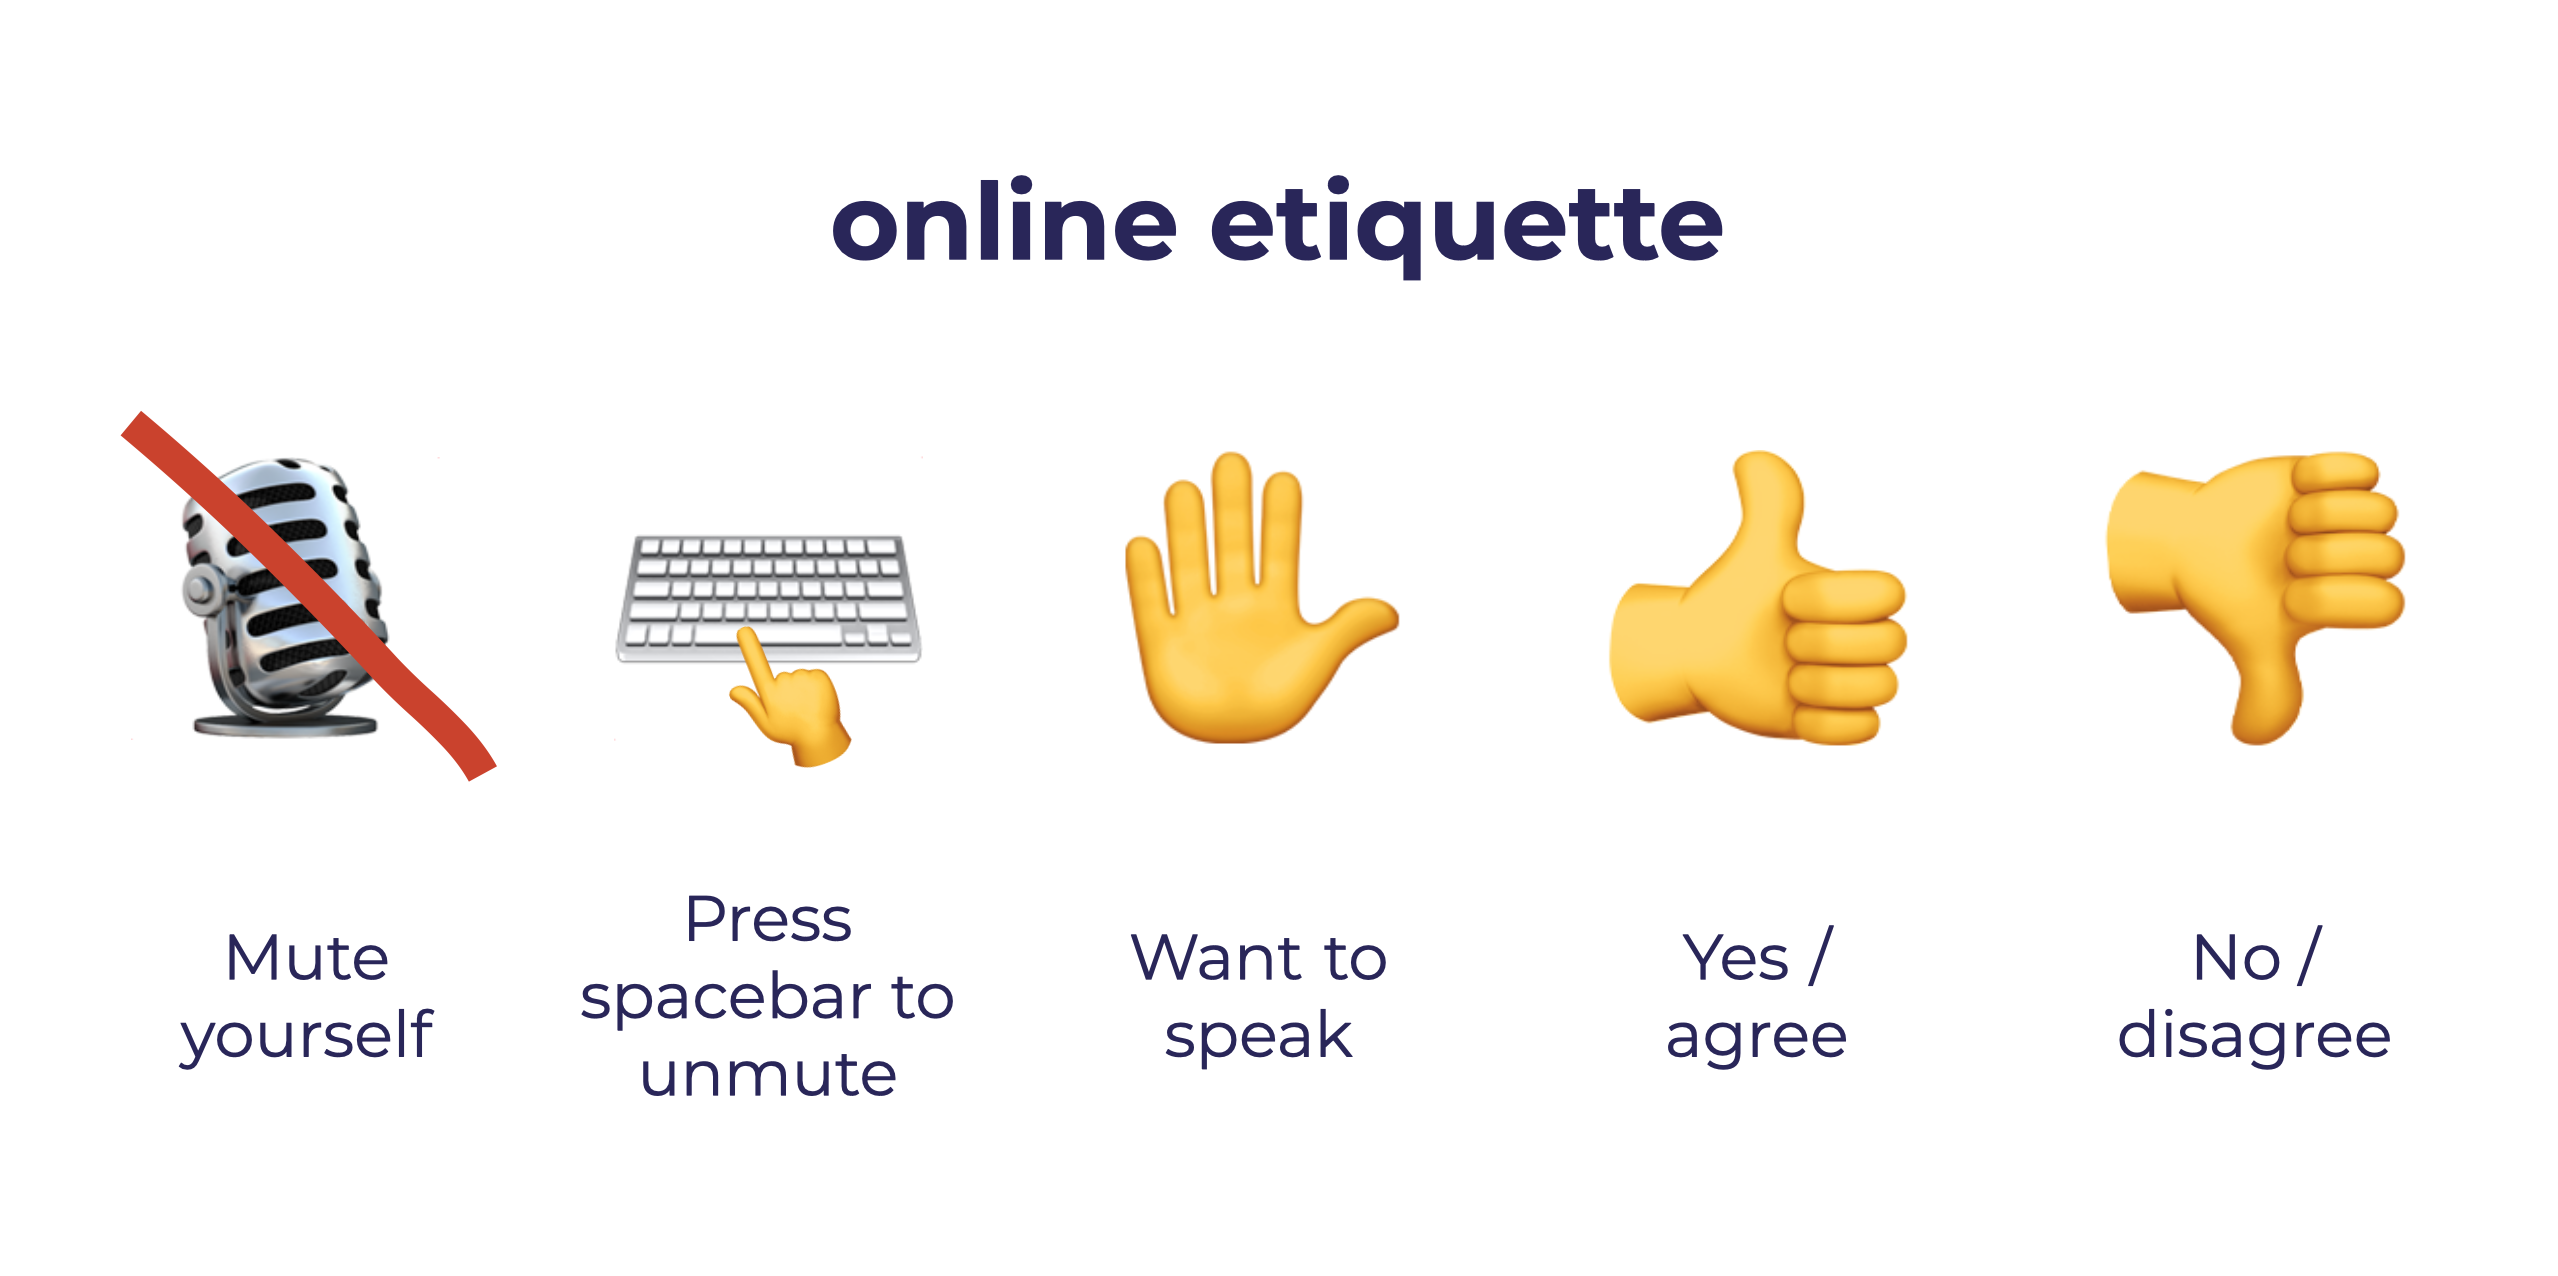
- Mute your microphone when not speaking
- Raise your hand when you want to speak
- Use thumbs up & down for simple yes or no questions
- Leave food for the breaks; chewing sounds and visuals are not appreciated
How to use Zoom
- Chats
- Reactions
- Non-verbal feedback